Website apps are essential for your small business to improve customer service, automate tasks, and provide a seamless user experience.
But creating a highly interactive and user-friendly web app isn’t easy. You need to balance functionality and aesthetics to meet users’ needs.
In this guide, I’ll cover everything you need to know about how to build a website app for your small business, including key considerations, steps, tools, and tips.
What is a Web App?
A web app is a type of software that operates in a web browser and can be used on different devices such as smartphones, tablets, and computers that are connected to the internet.
For example, Google Docs lets you create documents online instead of using software like Microsoft Word on your computer. Other well-known web apps are Gmail, Slack, and Facebook.
Instead of being installed directly onto a device’s operating system, you can access web apps through a web browser.
Here are some popular examples of web application:
X(Twitter)
Canva

Difference Between Website and Web App
A website and a web app serve different purposes and offer distinct functionalities. A website primarily provides information and content, often in a static format, such as blogs, news sites, and company information pages. Users mainly consume content with limited interaction.
On the other hand, a web app offers interactive and dynamic functionality that allows user to perform tasks or engage with various features, similar to desktop or mobile apps.
Different Type of Web Apps
Web apps that are custom-made can differ in how they are built or organized, and may include:
SPA – Single Page Application :
SPA is a web application that interacts with the user dynamically. It rewrites the current page rather than loading entire new pages from the server. This approach provides a more seamless and faster user experience.
Examples of SPAs : Slack, Gmail and Netflix.
MPA – Multi Page Application :
A Multi-Page Application (MPA) is a traditional web application structure where each page is a separate HTML file. When a user interacts with the application, such as clicking a link or submitting a form, the server loads a new page for each action.
Ecommerce websites like Amazon are examples of MPA.
PWA – Progressive Web Application :
PWAs are built with web technology, they work in any browser, but offer app-like features like offline access and notifications.
Examples of PWAs : Spotify, Pinterest, Uber.
Build web app from scratch step by step
Creating a web app can seem like a lot to handle, especially if you don’t have the technical know-how or money to hire app developers.
Below, I will break down the steps for creating a web app in a simple, easy-to-follow manner.
1. Decide on Your Approach
You have two options for creating your web app: using the traditional (custom) method or a no-code solution.
Traditional or Custom :
- Requires coding skills and knowledge of programming languages like HTML, CSS, JavaScript, Python and frameworks like React or Angular.
- Offers full control over design and functionality.
- Ideal for complex and highly customized applications.
- Can be expensive due to development time and hiring skilled developers.
No Code :
- No coding skills required; uses no-code editor like glide or bubble.
- Quicker to develop and launch.
- Suitable for simpler applications or those with standard functionalities.
- Generally more cost-effective with lower upfront costs
Pro Tip : Hire a web app development team for your website app project instead of relying on no-code tools for better customization, scalability, and advanced functionality..
2. Determine the Purpose
Before you build any website app figure out the problem you want to address, research why it happens, and talk to people who may be affected by it.
Then, analyze the suggestions for solving the issue and think about how your website app concept can solve the problem.
Your idea for a website app doesn’t need to be totally unique or fancy, but it should address a problem and help users in their daily lives.
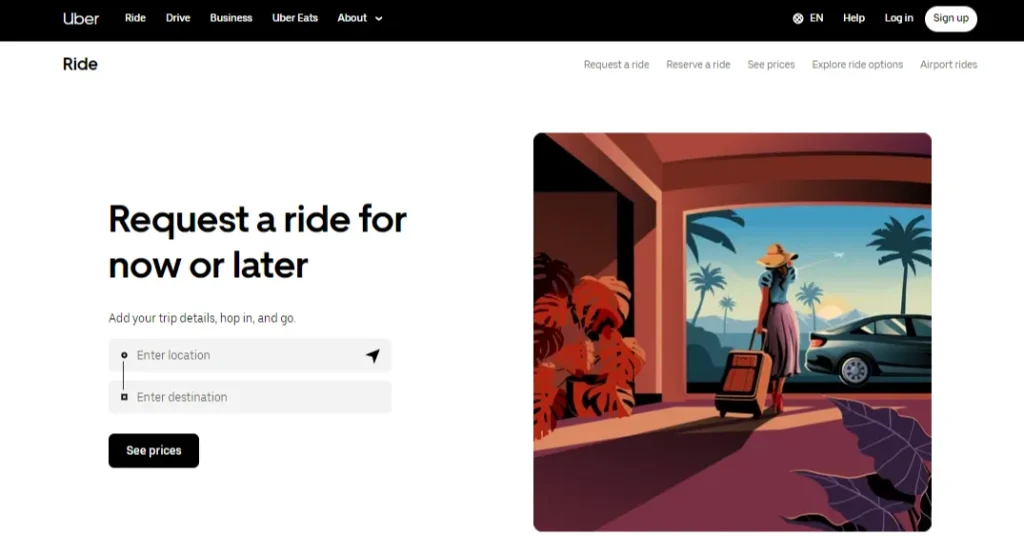
Take Uber as an example, its a ride sharing app that lets people get rides using their smartphones or tablets. But Uber also has a website that you can use on any browser, even if you don’t have the app downloaded?
This web version of Uber is handy for places with slow internet or older devices that can’t run the regular app. It’s designed to be light and quick to load on any device, making it easy for users to use without any trouble.
3. Conduct Market Research
After deciding on the purpose of your website apps, the next step is understanding your users and the market for your product. This will help you find any gaps where your web app idea can fill to stay ahead in the competition.
Look into your competitors by searching for keywords related to your web app idea on search engines and app stores. This research will show you what others are already doing and help you figure out how your web app can be unique.
Try to interact with potential users and ask them open-ended questions. During the conversation, pay attention to specific details such as:
– Who they are
– Their main challenges and difficulties
– Their goals and needs
– Exploring how your web app can provide solutions or address their needs.
When doing research on your competitors, make sure to find out:
– Other web apps that are similar to yours
– Competitors strength and weakness
– Market demand of your web app
– What makes your web app different from what is already out there
– New trends and technologies that could affect your success.
After gathering these insights, the next step is to determine the features and functions of your app.
4. Identify the Apps Functions:
With detailed insights from your potential users and competitor research you are ready to brainstorm your apps features and functions.
For example, a ride-sharing app includes features like booking a ride, creating a user profile, a payment option, a map feature to select destinations, and a rating system.
Uber’s web app, for instance, allows users to book rides, create profiles for both passengers and drivers, add and manage payment methods, and view their ride history and expenses from their dashboard.
Just like that, consider what features and functions your web app needs to make it better for users. Think about what your users want and how your app can help them in the best way possible.
Now that you’ve identified your app’s functions, the next step is designing a workflow.
5. Design Workflows
Create a basic version of your web app called an MVP, which should include all the main features you planned out for your website app in step four.
You can sketch the basic layout on paper or write down the outlines on a Google Doc. This sketch or outlines includes where images, buttons, fonts, text, animated elements and other elements of your web app will go.
Next, create a work flow showing how you think people will use your app. For example, what happens after someone signs up for an account? Do they go back to log in, verify their account, or go straight to using it?
Organize the steps in your plan, adding as many details as you can.
Follow these steps to create your workflow :
- Think about how people will use your app: Plan out the sequence of your web app, how users will click through them, and how information will be organized.
Then try to visualize how users will move through the app to find what they’re looking for. - Outline and define user interaction : Explain the steps users will take when using your app, like signing up, logging in, looking around, and buying things.
- Visualize screen transition : Think about how user will move from one screen to another. Figure out what actions will make the screen change, such as clicking a button, choosing an option, or submitting a form.
This will ensure a better navigation experience for your web app. - Determine data flow : Think about how data will flow on your web app and how it will handle storing, processing, and getting user inputs.
Also identify the APIs, databases, and data sources that you will connect with your web app.
6. Design a Prototype
After designing the workflow your next step is designing a prototype of your web app. A web app prototype is a mockup of your web application that helps you to visualize and test its functionality.
Benefits of Creating a Prototype :
-Allows you to see and test the design of the app early on.
-Helps to showcase your project to the investors (if you have any) to raise funds for your web app.
– Identifies potential issues and improvements before development.
– Helps to estimate the project cost.
-Saves time and resources by refining ideas early in the process.
– Let you perform user testing so that you can validate the apps feature and functionality.
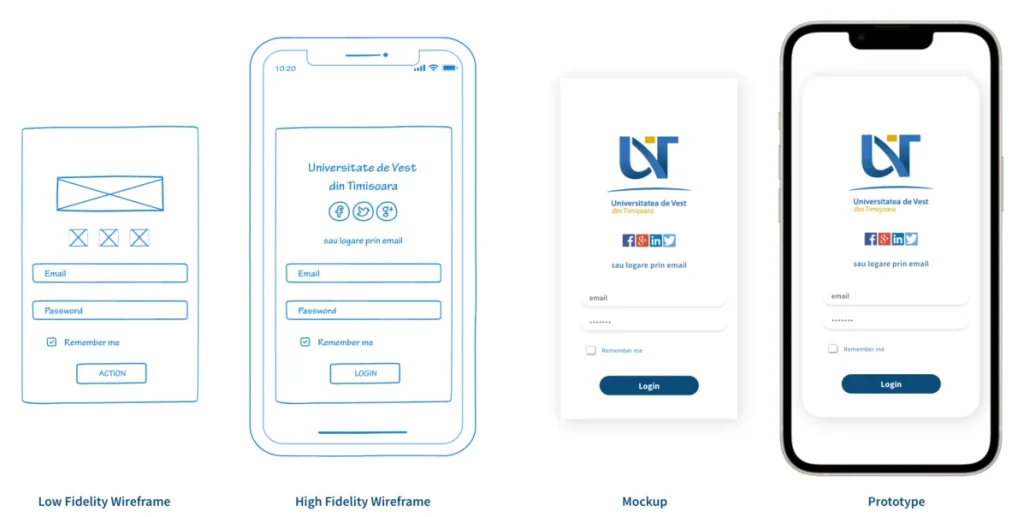
How to Design a Prototype :
Follow the steps below to design your web apps prototype :
– To create a web app prototype, you should hire a web app development agency.
– After that, develop the back-end of your app to handle data, user access, and security.
– Check to make sure everything flows smoothly and makes sense in your web app prototype.
Share your prototype with the investors or users to get feedback and see if it works well.
7. Test and Improve
There are several important tests you should do to improve your web apps performance.
Functionality test : Check your web app to make sure it connects and integrate properly with the database, all the links between pages are working, and it collects user information correctly according to the data schema.
Usability : Asses the overall user experience of your web app from the feedbacks of your team members or outside users.
Interaction : Check how well your app server and web server communicate with each other and with users to make sure everything runs smoothly.
Compatibility : Check your web app on various devices and browsers to ensure it functions correctly.
Performance : Test how well your website works when lots of people are using it to find out any possible slowdowns or issues. Also check how fast the app responds with different internet speeds.
Security : Evaluate your website application to find and fix any security weaknesses to keep user information safe and maintain the overall reliability of your app.
After conducting all these tests and making any necessary fixes, your next important step is marketing the web app.
8. Market Your App
Promoting your website application can help attract more customers. You can achieve this through a digital marketing strategy, which includes:
- Search Engine Optimization (SEO) : Optimize your web app content and structure to rank higher on search engine results pages. Use relevant keywords, title tag, and meta description.
SEO helps to increase organic traffic and makes it easier for potential customers to find your app. - Social media marketing : Use platforms like Facebook, Twitter, Instagram, and LinkedIn to promote your web app. Share engaging content related to your web app, interact with followers, and run targeted ad campaigns.
- Content marketing : Create valuable and informative content related to your web apps industry. Share tutorials, tips, and insights to engage users.
- Influencer marketing :Partner with influencers who have a strong following in your target market. Influencers can promote your app to their audience through reviews, tutorials, or sponsored posts.
- Email marketing : Build and maintain an email list to communicate directly with your audience. Send newsletters, promotional offers, and updates about your app.
- Paid ads : Invest in paid advertising on platforms like Google Ads, Facebook Ads, and Instagram Ads. Use targeted campaigns to reach specific demographics and drive traffic to your app.
Do you need help promoting your web app? You can rely on our skilled digital marketing professionals to create a successful marketing plan.
9. Analyze Performance
Keep an eye on important metrics to learn more about the app’s performance and make informed decisions. Important metrics to follow :
Active and new devices: This shows the total number of devices that have your app installed and opened at least once.
Sessions: How many times users have opened your web app.
Screen views: Total number of screens users have looked at in the app.
Popular screens: This tracks which screens are most popular among users across their interactions with the app.
Interactions: Number of actions users have taken in the app, such as clicking buttons, menu items, or links.
Actions per user: How many actions each user has taken in the app.
Active users: This keeps track of the users who are most active on your web app.
10. Launch or Deploy Your App
You have different ways available to launch your web app, like making a serverless app, using containers, or setting up virtual machines. Each method has its own benefits and you need to choose one that best suits your needs.
How to Design A No-code Web App
Creating a no-code web app can be an efficient and accessible way to bring your ideas to life. Here are the steps to create a no-code web app:
Define Your App’s Purpose and Goals:
- Identify the primary function and objectives of your app.
- Determine your target audience and their needs.
Choose a No-Code Platform:
- Research and select a no-code platform that fits your requirements (e.g., Bubble, Adalo, Webflow, Glide).
- Sign up and familiarize yourself with the platform’s interface and features.
Plan Your App’s Structure:
- Sketch a basic outline of your app’s layout and user flow.
- Create a sitemap to organize your app’s pages and navigation.
Design Your User Interface (UI):
- Use the platform’s drag-and-drop tools to design your app’s interface.
- Customize the visual elements, such as buttons, forms, and images, to align with your brand.
Configure Database and Data Models:
- Set up your app’s database to store user information and other relevant data.
- Define data models and relationships between different data types.
Implement Functionality and Workflows:
- Add necessary features like user authentication, data submission forms, and dynamic content display.
- Set up workflows to automate tasks and define app behavior based on user actions.
Test Your App:
- Thoroughly test your app for functionality and usability.
- Gather feedback from potential users to identify and fix any issues.
Deploy Your App:
- Publish your app on the web using the no-code platform’s deployment tools.
- Obtain a custom domain if desired and configure it for your app.
Note: Creating a web app with no-code platforms may not always provide the full flexibility and customization you might require. These platforms are ideal for rapid development and simpler applications. That’s why, for the long run, we suggest traditional or custom development options.
Hire Top 5% Remote Web App Developers Within 24 Hours
Get the expert vetted web app development team from Laraforest that suits your time zone and work style. Save both time and money in the hiring process.
